Creating Glass Pendants, Pins and Ornaments
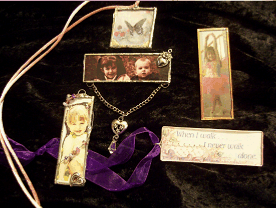
        Glass pendants, pins and ornaments can be given as beautiful mementos of special occasions, to share memories or to capture pictures of loved ones.  Each one a unique reflection of you and your creativity.  Here are some ideas for your projects followed by the "easy" instructions and then more difficult instructions depending on the project detail you are interested in creating.
*Weddings- Create a keepsake ornament using the names         of the bride  and groom and their special date, include         a special message or verse.
*Accomplishments- Marathons, Graduations,         Promotions, share treasured works of art or other personal victories.
*Fighting Illness- Encouraging verses, prayers and         inspirations to give strength as they fight their battle to know they are not alone.
*Celebrations- Birthdays, A New Baby, Engagements,         Pregnancy, New Job, Anniversaries, Relay For Life or         To Celebrate Friendship.
*Remembrance-Place the picture of a lost loved one in         one side and their favorite saying, inspiration or payer on the other side for a priceless present.


Easiest instructions for Glass Slide Pendants
The glass slide pendants with a 1/8" ribbon edging are the simplest to create and the ribbon edging can give you a beautifully softened look as well as a splash of color.
You will need :
  • The pictures, inspiration, verse or design you have chosen for your  creation.
  • 2 Glass Slides
  • 1/8" Satin Ribbon approx. 9" long.
  • Glue suitable for glass and fabric
  • 1 metal Jump Ring
  • Your choice of ribbon, chain for necklace or pin back.
  • Decorations or charms as desired.        
OR- 1 Precious Presents Ribbon Glass Pendant/ Ornament kit.

 Steps
  1. To create your Pendant, cut your  filler, picture, verse etc. for the front view and the back view so that it fits within the edges of the glass slide. 
  2. Clean both sides of the slides so that they are free of fingerprints and debris.  Place the filler between the slides. If you would feel more comfortable you may secure the slides together with small pieces of tape.  As you make more you will soon become more proficient and not need the tape.  Be sure to remove the tape on each side before applying edging.
  3. Locate the edge you want to be the top and apply a thin layer of glass glue to both slides on this end but only slightly less than half way across.  Do not go past the middle as this is where you will put your jump ring.
  4. Lay one end of your ribbon on the glue, centering it so that it does not extend over either slide but is even on the top.  Be careful not to apply too much glue, a thin layer will do better.  Some glue dries very quickly so be careful not to glue yourself to the project. (It happens and it hurts!)  Allow to dry for a minute or two.
  5. Slip your jump ring over the loose end of ribbon and slide down to the glass. (Skip the jump ring if you are making a pin)
  6. Apply the glue to the remaining top half of the slide including the area under the jump ring.  Again, a thin layer works better than a thick layer.
  7. Smooth the ribbon into the glue and stand the jump ring up, making sure that it is centered in the slide.  Work as fast as you can as the glue sometimes dries fast.  Press the ribbon down on either side of the jump ring to create a seal.  Wipe away any glue that appears on the slides according to manufacturers instructions.
  8. Add ribbon to the remaining 3 sides in the same "thin layer of glue" manner.   I feel more comfortable applying glue to only approx. 1 inch at a time. 
  9. Now that you have covered all 4 sides, you can take the remaining tail of your ribbon and glue it to the top ribbon that you applied first, making  sure to slip it thru the jump ring.  Trim off the excess at the end.
  10. After it has dried completely you may carefully clean the glass (I use Q-Tips) and add beads, jewels, charms, ribbon roses or any other accent you would like with gem glue  or glass glue.

More difficult instructions for leaded glass look Pendant, Pin or Ornament
You will need:
  • Pictures, Inspirations or Verse of your choice for the filler.
  • 1 Jump Ring
  • 2 Glass Slides
  • Copper foil edge wrap tape
  • Accents, chains, beads, wires etc. for accents
  • Lead free Solder
  • Paste Flux
  • Soldering tool (available for approx. $10.00 and up)
Be aware, if your know someone who has worked on their own plumbing, these are common tools they might let you borrow.

OR
1 Precious Presents Solder Pendant Kit, your own Paste Flux, solder and soldering tool

1. Follow Ribbon instructions Step 1 and Step 2 then continue on step 2 here.
2. Holding glass slides in place, apply copper foil wrap to all 4 sides of the slides, carefully centering the tape on the edge of the slide so that it will appear even on each side of the slides.  Overlap the edge of the tape slightly where you started.  Smooth well the edges of the copper tape down with a smoothing tool or the back of your fingernail.  Fold the corner of the tape as if you were wrapping a package.  You may at this time trim any areas of the foil tape that are irregular or uneven with a razor knife. 
3. At this point you may glue a pin back to the back of the slide if you are creating a copper framed pin. Continue to Step 4 if you are creating a pendant, ornament or silver framed pin.
4. Apply paste flux thinly and evenly with a Q-Tip or cotton swab over copper tape, covering all edges of the tape.  Wipe away any excess flux  with a dry cotton swab.  At this point I will hold the slides with a small plastic clamp or handmade cardboard stand.                                                                                   
                                                                                                                                                                                                                                                                                                                                                                                                                                                                                                                                                                                                                                                                                                                                                                                                                                                                                                                                                                                                 
                                                                                                                                                                                                                                                                                                                                                                                                                                                                                                                                               
5. Holding the solder in one hand and the soldering tool in the other, apply a small droplets of the melted solder to the copper tape, smoothing with the soldering tool as you go until all 4 sides  of  the tape is covered and smoothed to your liking. 
6. Solder a jump ring  securely into the top center of the slides  with a small bead of solder to create a pendant or an ornament or glue a pin back on for a pin.
7. The silver solder can be polished at this time and the glass carefully cleaned.
8. At this point you can add metal trims such as chains, metal trim, and wires accented by beads with a drop of solder.  You may add plastic beads or other trims with glue.


Ranger Memory Glass Pendant
One of the pendants in the pictures above is in a Ranger Memory Glass Frame.  This is a very simple and easy way to construct the pendants.  Ranger Memory Glass and Frames come in a variety of sizes and can be purchased at craft stores or online.
My Relay For Life Pendant
The names of loved ones I have lost to cancer on the back.
The Precious Presents . . .